Integrating Alpine.js with Eleventy & YAML files to create Alpine Playground's Collections
Adding collections to Alpine.js Playground, essentially bringing it in line with projects such as awesome-alpine and alpinetoolbox.com.
It came from the fact that I’m curating quite a bit of content for each newsletter and it makes sense that content featured on the newsletter should be accessible in an easy to scan manner.
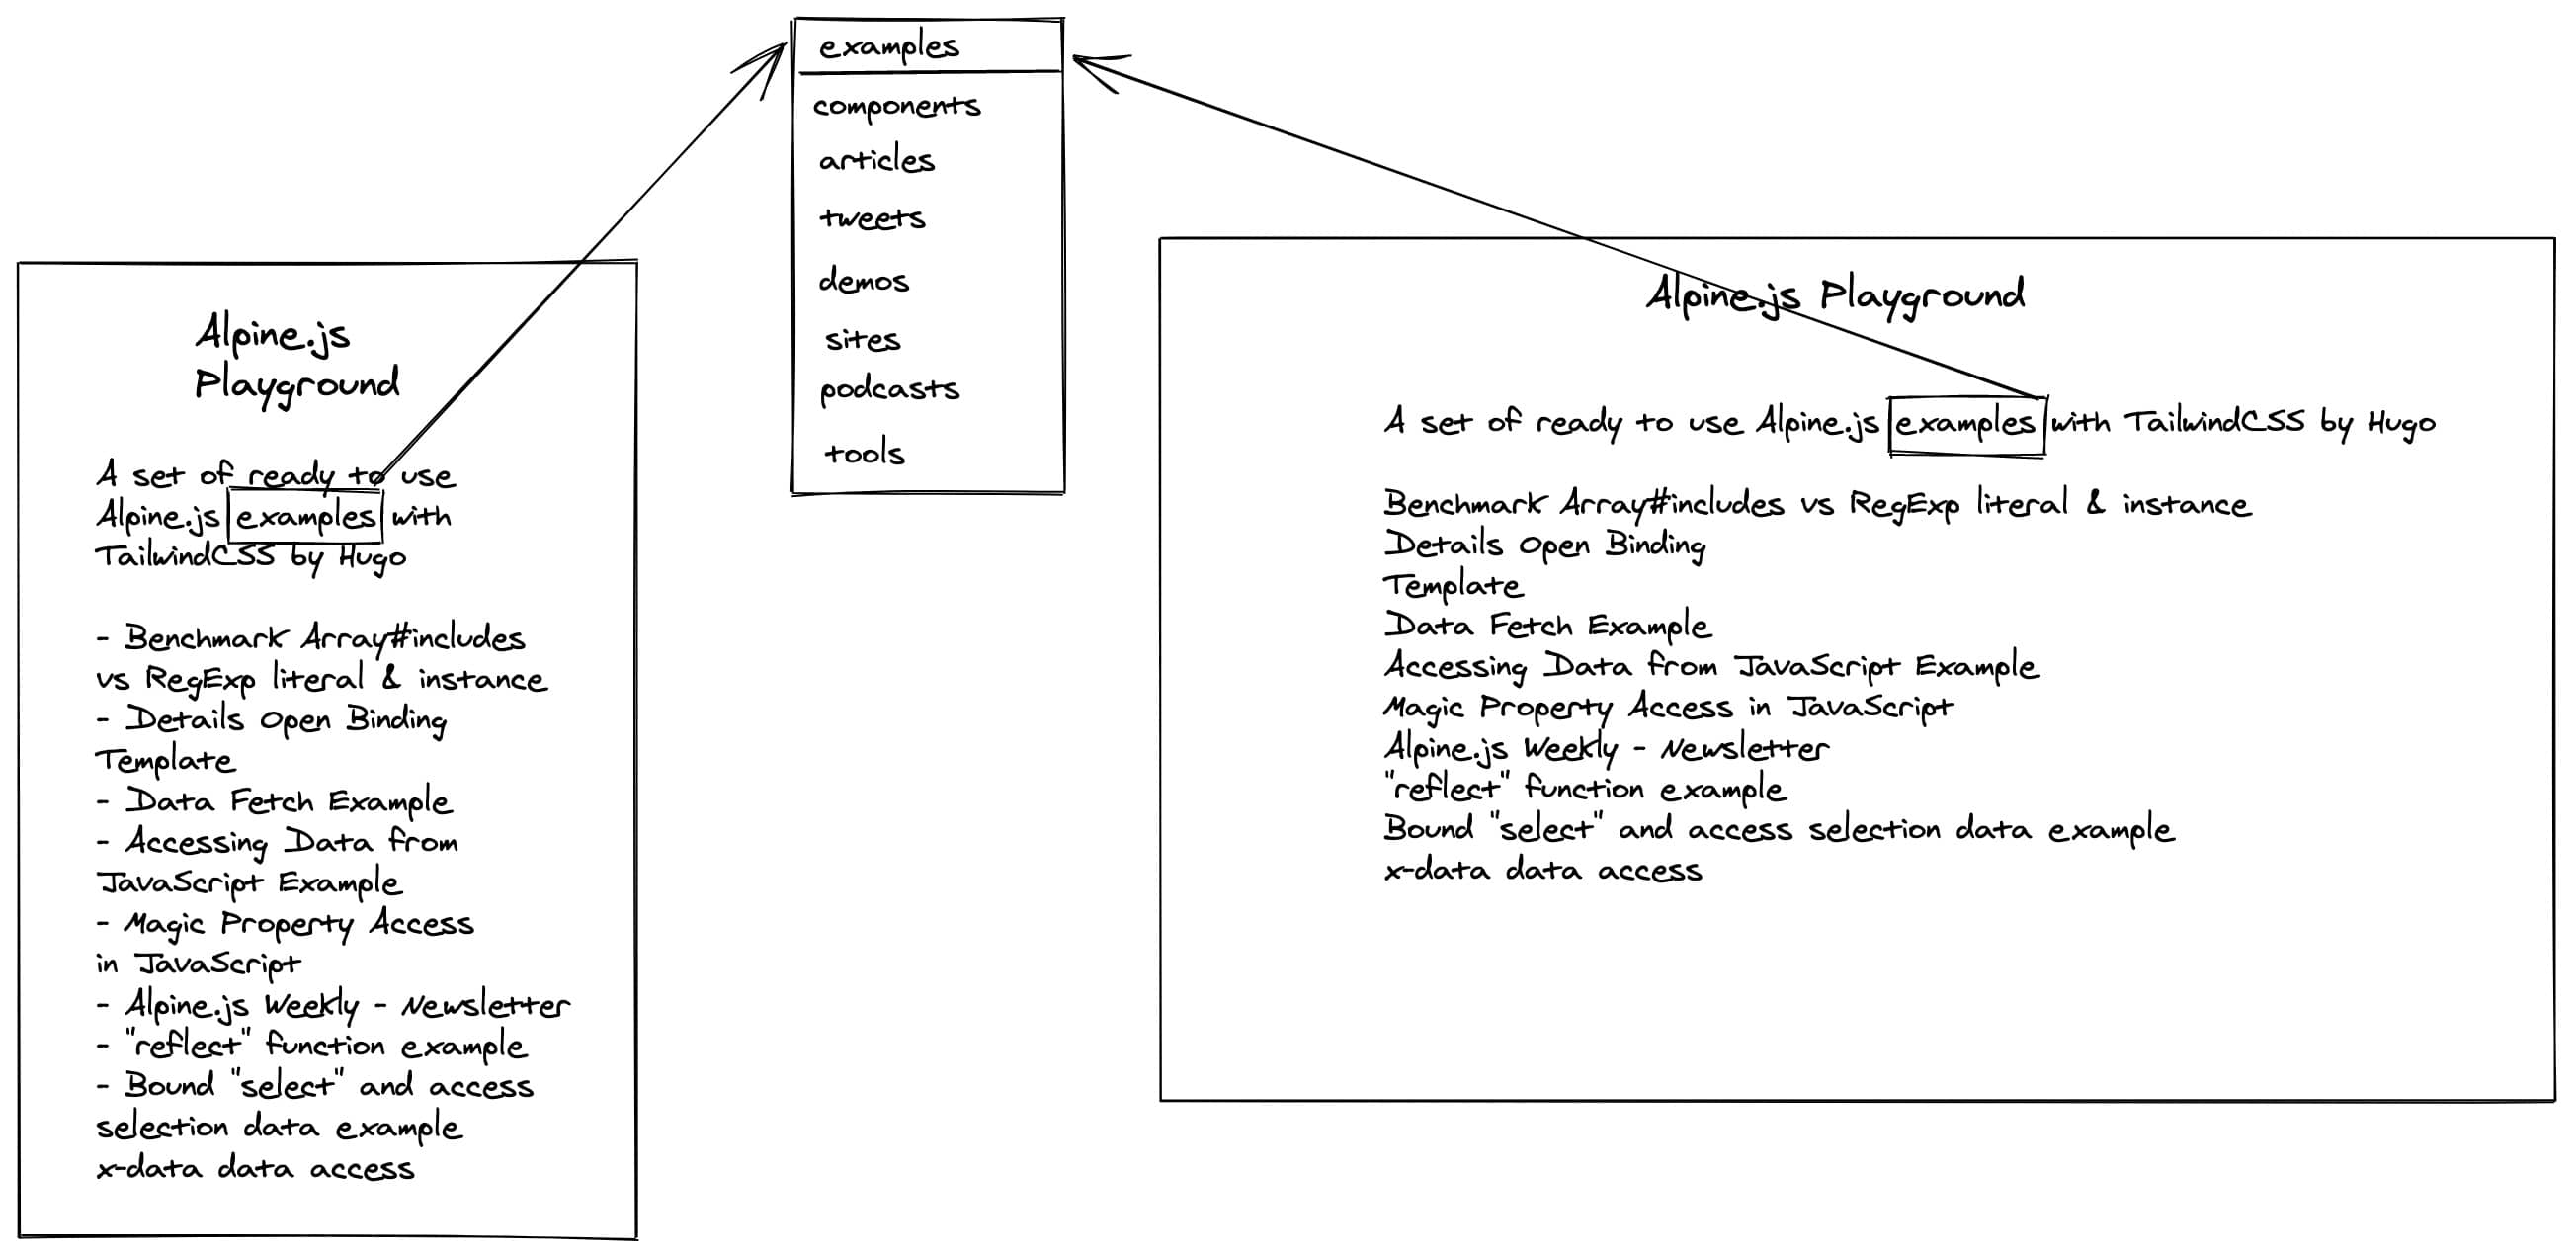
Here’s the rough mockup of what it should look like, ready for comparison with how it ended up looking on Alpine.js Playground Collections
While building this new feature, I came across a couple of interesting problems to which I’m documenting the solutions in the post.
There were 2 big parts to the implementation: Eleventy data capture + injection and then implementing with Alpine.js.
Table of Contents
Handling pre-rendering on the Eleventy side
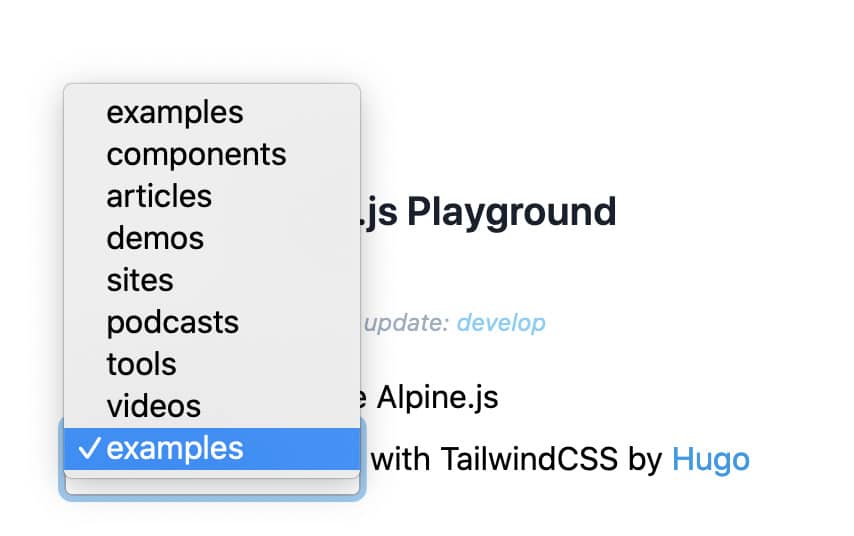
To begin with we need to introduce a select, where we used to inject {{ pkg.description }}, we’ll now need actual interactive content. Seeing as Eleventy renders to static markup, we should default to “examples”, which the content that’s rendered by default on the page.
This means that if for whatever reason the Alpine.js application crashes, the page will still display.
You can read more about how we’re rendering the examples with Eleventy and Nunjucks in How to migrate a bunch of HTML pages (Alpine.js Playground) to Eleventy
A set of ready to use Alpine.js <select
  class="omitted">
  <option value="examples" selected>examples</option>
</select> with TailwindCSS
Re-introducing Alpine.js
We need to add the Alpine.js file from the JSDeliver CDN.
<script
  src="https://cdn.jsdelivr.net/gh/alpinejs/[email protected]/dist/alpine.min.js"
  defer
></script>
We’ll also set up x-data on the root div and the relevant page() function.
<!-- head etc. -->
<body class="flex">
  <div
    x-data="page()"
    class="flex mx-auto flex-col items-center px-8 md:px-32 py-24"
  >
  <!-- rest of template -->
  </div>
  <script>
    function page() {
      return {
        selectedType: "examples"
      }
    }
  </script>
</body>
Sourcing and injecting data from YAML Eleventy data files
YAML file structure & data entry
I’m using YAML because it’s a bit more wieldy than JSON for data entry. An example item looks as follows. It’s a simple list of objects with a title, url and a “by” nested object, which has its own name and URL. Some types of data will have extra fields.
- title: Alpine.js is like Tailwind CSS for JavaScript
  url: https://devmode.fm/episodes/alpine-js-is-like-tailwind-css-for-javascript
  by:
    name: devmode.fm
    url: https://devmode.fm
We add and manually populate the relevant YAML data files:
_data/articles.yamlwhich will be stored underarticles, articles & tutorials about Alpine.js_data/builtWith.yamlwhich will be stored underbuiltWith, it corresponds to site that are built with Alpine.js_data/components.yamlwhich will be stored undercomponents, ready to use Alpine.js components_data/demos.yamlwhich will be stored underdemos, cool demos using Alpine.js, there’s a bit of overlap between demos and components_data/podcasts.yamlwhich will be stored underpodcasts, podcast episodes about Alpine.js_data/tools.yamlwhich will be stored undertools, tools for Alpine.js, eg. alpinejs-devtools, the Alpine.js Discord_data/videos.yamlwhich will be stored undervideos, Alpine.js videos
Setting up Eleventy-YAML integration
By default Eleventy doesn’t support YAML data files.
In order for Eleventy to read YAML data files, we need to follow the documentation. We install js-yaml and use addDataExtension in the .eleventy.js configuration file.
const yaml = require("js-yaml");

module.exports = function(eleventyConfig) {
  eleventyConfig.addDataExtension("yaml", contents => yaml.load(contents));
  // rest of config
}
How to inject Eleventy data into a HTML/Nunjucks template
We need to inject all the data. In order to keep the syntax highlighting from breaking on this file too much, I opted to inject it as a global and in a separate script tag.
With Nunjucks, we can use {{ data | dump | safe }} to print JSON out. JSON is a subset of JavaScript, so it works as a regular JavaScript definition.
We need to do some extra work for examples that’s similar to the work in How to migrate a bunch of HTML pages (Alpine.js Playground) to Eleventy. Namely, we need to loop through the collections.all list and
<!-- head etc. -->
<body class="flex">
  <!-- template -->
  <script>
    // dump a bunch of data on the page
    window.__collections = {
      examples: [
        {% for page in collections.all %}
        { url: {{ page.url | dump | safe }}, title: {{ page.data.title | dump | safe }} },
        {% endfor %}
      ],
      components: {{ components | dump | safe }},
      articles: {{ articles | dump | safe }},
      // tweets: @todo
      demos: {{ demos | dump | safe }},
      sites: {{ builtWith | dump | safe }},
      podcasts: {{ podcasts | dump | safe }},
      tools: {{ tools | dump | safe }},
      videos: {{ videos | dump | safe }}
    };
  </script>
  <!-- rest of body, including scripts -->
</body>
In our Alpine.js component, we can now read from this global. We’ll store the list as a flat list of “options” (for our select) and as a “collections” property.
<!-- head etc. -->
<body class="flex">
  <!-- rest of template & 11ty variable injection -->
  <script>
    function page() {
      return {
        // other properties
        options: Object.keys(window.__collections),
        collections: window.__collections,
      }
    }
  </script>
</body>
Implementing select toggling using Alpine.js
Since we’ve got the available options available as the options property, we can use Alpine.js’ x-for to render out the relevant option elements inside the select. Each option element has its value and x-text bound to the name, eg. “tools” will have value “tools” and its text will be “tools”.
We’ll also 2-way bind to selectedType with x-model on the select.
<select
  class="omitted"
  x-model="selectedType"
>
  <template x-for="option in options" :key="option">
    <option :value="option" x-text="option"></option>
  </template>
  <option value="examples" selected>examples</option>
</select>
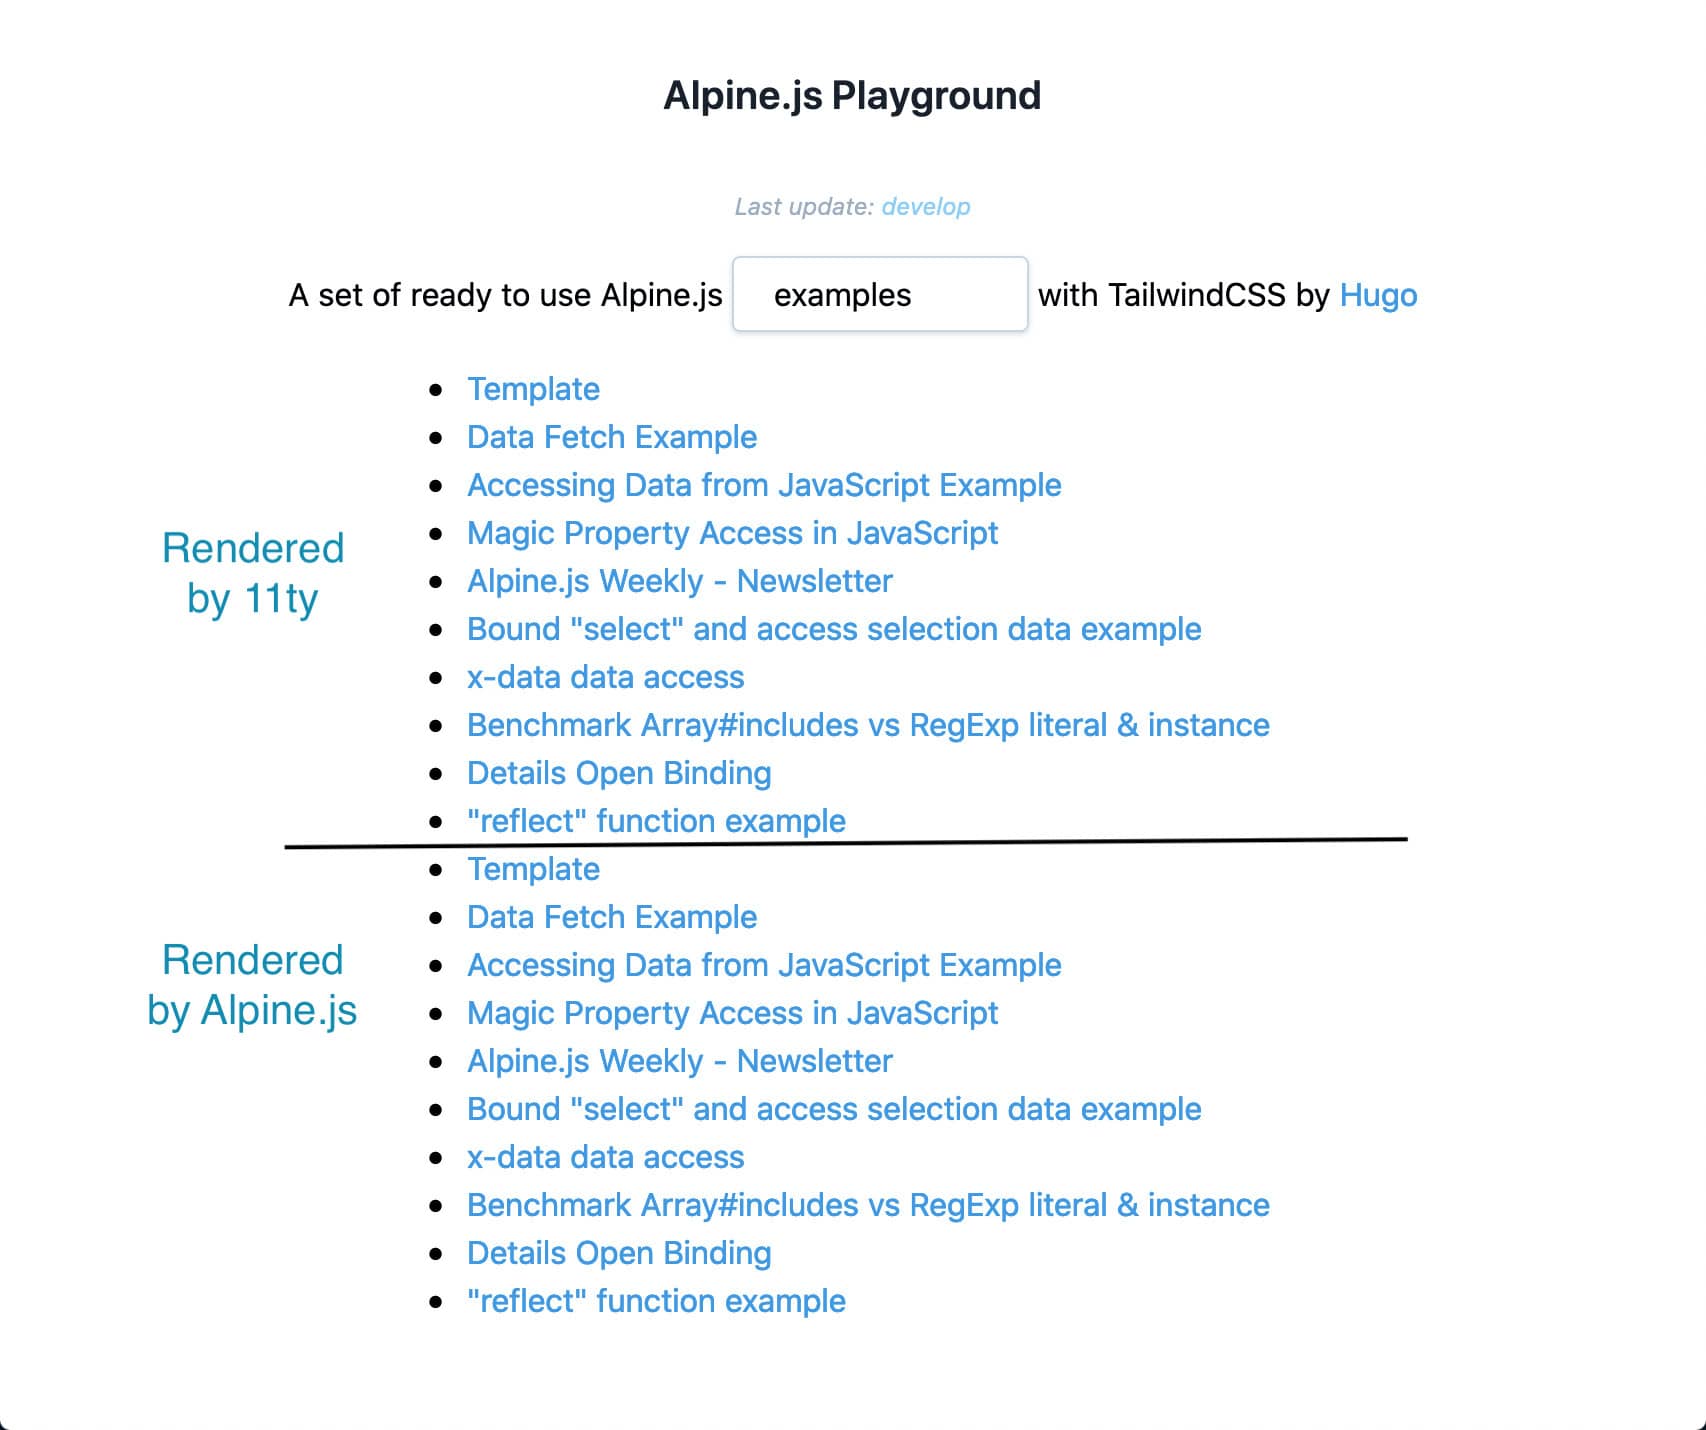
This renders as follows, with an extra “examples” option. That’s because Alpine.js has no way of knowing that it needs to wipe out the pre-rendered examples “option” element.
We’ll wait until the next section to get rid of pre-rendered elements, for now we’ll handle rendering the correct list of links based on the selectedType.
The current template for the list is pre-rendered statically and is as follows.
<ul class="omitted">
  {% for page in collections.all %}
  <li class="omitted">
    <a
      class="omitted"
      href="{{ page.url }}"
      >{{ page.data.title }}</a
    >
  </li>
  {% endfor %}
</ul>
We’ve not got collections available, which means we can add client-side rendering with Alpine.js to the list. We use the selectedType to get the right collection to loop through using x-for and item in collections[selectedType]. Each of the list items, gets a link (a) with the href bound to the URL of the item and the text of the link set to the title property. We also conditionally render the by property using x-if, if it exists, we’ll render “by name” where name is a link whose text is bound to by.name (if set) or by.url and href is bound to by.url.
<ul class="omitted">
  {% for page in collections.all %}
  <li class="omitted">
    <a
      class="omitted"
      href="{{ page.url }}"
      >{{ page.data.title }}</a
    >
  </li>
  {% endfor %}
  <template x-for="item in collections[selectedType]">
    <li class="list-disc w-full">
      <a
        class="omitted"
        :href="item.url"
        x-text="item.title"
      ></a>
      <template x-if="item.by && item.by.url">
        <span>
          by
          <a
            class="omitted"
            :href="item.by.url"
            x-text="item.by.name || item.by.url"
          ></a>
        </span>
      </template>
    </li>
  </template>
</ul>
As we can see in the following image, much like for the option-s, the list gets rendered twice, once by Eleventy (at build time) and once by Alpine.js (at runtime on the client). We’ll now tackle this issue of clearing pre-rendered elements on Alpine.js initialisation.
Cleaning up pre-rendered elements on Alpine.js initialisation
For elements that just need to dissappear when Alpine.js initialises, we could use x-show="false".
We actually want to remove some of these items.
In order to do this, we’ll add the x-remove attribute to all the list items and the option that need to be deleted on initialisation.
<select
  class="omitted"
  x-model="selectedType"
>
  <template x-for="option in options" :key="option">
    <option :value="option" x-text="option"></option>
  </template>
  <option x-remove value="examples" selected>examples</option>
</select>
<!-- rest of template -->
<ul class="omitted">
  {% for page in collections.all %}
  <li class="omitted" x-remove>
    <a
      class="omitted"
      href="{{ page.url }}"
      >{{ page.data.title }}</a
    >
  </li>
  {% endfor %}
  <!-- Alpine.js list items template -->
</ul>
We’ll can then add the following init() function and set it to run using x-init="init()".
Our init function will select all elements inside the Alpine.js component with the x-remove attribute and call the .remove() function on them.
<!-- head etc -->
<body class="flex">
  <div
    x-data="page()"
    x-init="init()"
    class="flex mx-auto flex-col items-center px-8 md:px-32 py-24"
  >
  <!-- rest of template -->
  </div>
  <script>
    function page() {
      return {
        init() {
          this.$el
            .querySelectorAll("[x-remove]")
            .forEach((el) => el.remove());
        },
        // other properties
      }
    }
  </script>
</body>
The list is not not rendering twice and the “examples” option is only appearing once.
We’ve now seen how to remove pre-rendered content when Alpine.js boots up. In the next section we’ll look at how to overwrite text content with Alpine.js.
Modifying pre and post “select” text with Alpine.js
“A set of ready to use Alpine.js examples with TailwindCSS by Hugo” works but “A set of ready to use Alpine.js articles with TailwindCSS by Hugo” is inaccurate.
Ideally, the “pre” and “post” selected type text could change based on the selected type.
Eg. for articles: “A set of Alpine.js articles by Hugo” would be enough.
In order to do this we need to make the “ready to use Alpine.js” and “with TailwindCSS” dynamic. Which we can do as follows by wrapping then with <span x-text="pre()"></span> and <span x-text="post()"></span> respectively.
 A set of <span x-text="pre()">ready to use Alpine.js</span>
<select><!-- options template etc --></select>
<span x-text="post()">with TailwindCSS</span> by
<a
  class="omitted"
  href="https://codewithhugo.com/tags/alpinejs"
  >Hugo</a>
Implementing the pre and post functions can be done by using a switch over this.selectedType and returning different strings. We default to pre being “Alpine.js” and post being empty. Which means by default we’ll render “A set of Alpine.js {{ selectedType }} by Hugo”, which should work for most things. The other options are just an exercise in copywriting.
<script>
  function page() {
    return {
      // other component properties
      pre() {
        switch (this.selectedType) {
          case "examples":
            return "ready to use Alpine.js";
          case "sites":
          case "tools":
            return "relevant";
          default:
            return "Alpine.js";
        }
      },
      post() {
        switch (this.selectedType) {
          case "examples":
            return "with TailwindCSS";
          case "components":
            return "ready to copy-paste";
          case "articles":
          case "demos":
            return "for your perusal";
          case "sites":
            return "built with Alpine.js";
          case "podcasts":
            return "🎧 for your commute";
          case "tools":
            return "to supercharge your Alpine.js dev";
          default:
            return "";
        }
      },
    };
  }
  </script>
Which yields the following, bit janky to have different sized content maybe but works as designed.

We’ve now seen how to overwrite pre-rendered/default text in Alpine.js using wrapper HTML tags and x-text.
In the next section we’ll look at how to make the Alpine.js state shareable by reading and writing it to the URL.
2-way binding the URL with Alpine.js application state
We’ve now got a working “select” for the collection type.
What if we want to share that page? For example if someone is asking about some demos and I want them to land on the page with “demos” pre-selected? The answer, is to use the URL.
What we’ll do is sync the selectedType as a type query parameter (in the URL).
Fetching “type” query param from URL
To get the “type” parameter from the URL, we can create a URLSearchParams object from window.location.search and call .get('type') which will get the type query parameter if it exists from the URL’s search section (the part after the ?).
If type is not set, we’ll default to “examples”.
Once we’ve got the type from the URL, we can use it as the initial value for selectedType in the component reactive properties.
In our page function that gives the following.
<script>
function page() {
  const selectedType =
    new URLSearchParams(window.location.search).get("type") || "examples";
  return {
    // same as selectedType: selectedType
    // see "JS object properties shorthand"
    selectedType,
    // other properties
  }
}
</script>
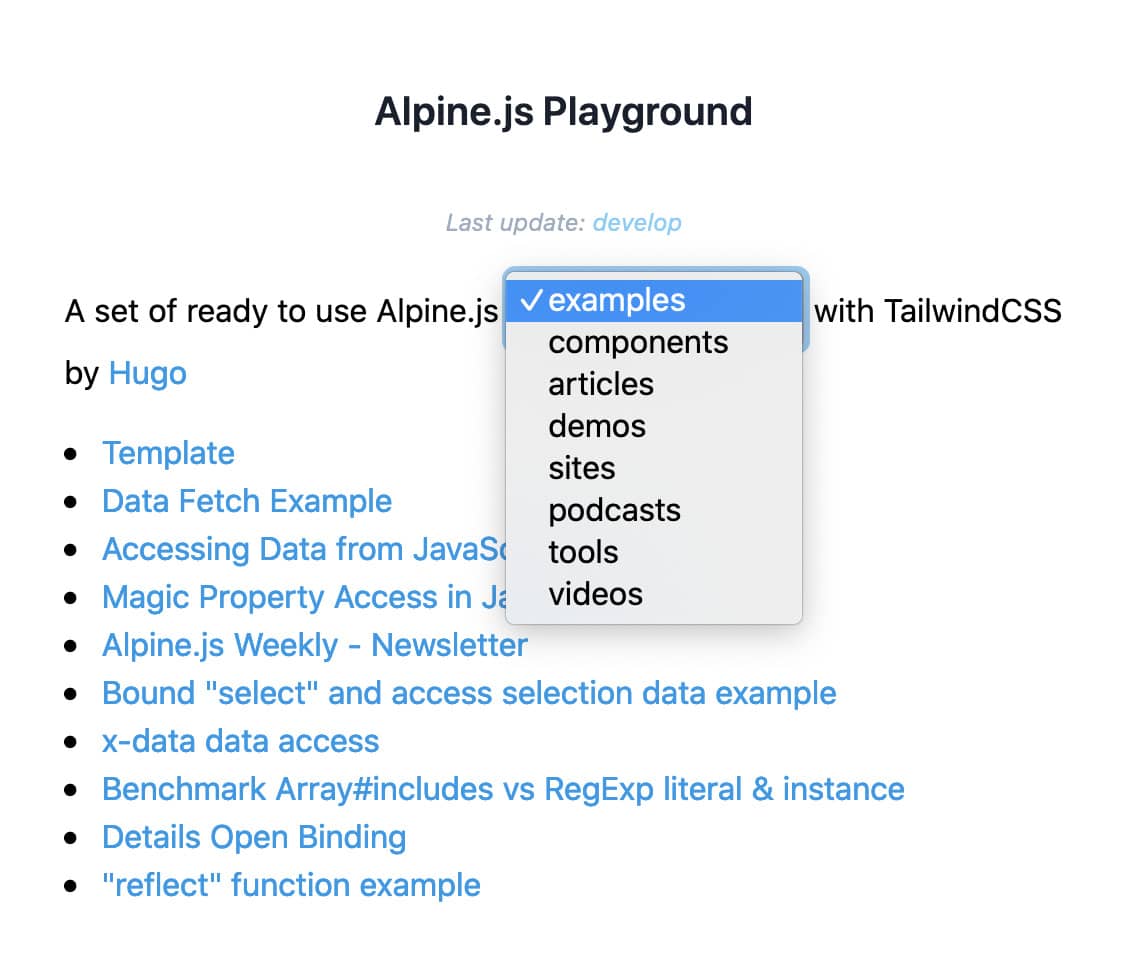
When we go to try this out, we get an issue though. If we manually go to ?type=tools we get the following state in the application. Where examples is selected in the “select” despite items in the tools collection being displayed.

The way to fix this is to actually set the selectedType as "" initially.
Then during init(), after we remove the items with x-remove and Alpine.js finishes rendering, we can set it. The code would be as follows.
<script>
  function page() {
    // populate selectedType
    return {
      selectedType: "",
      init() {
        // remove elements that have `x-remove`
        this.$nextTick(() => {
          this.selectedType = selectedType;
        });
      },
      // other properties
    };
  }
</script>
We’ve now seen how we can drive the application’s initial state through the URL. However, the application’s URL doesn’t change when the selected type changes.
Next we’ll see how we can make sure any changes in selected type are synced to the URL.
Using $watch to set the query param on selectedType change
In order to sync state back the the URL, we’ll use $watch and history.pushState from the History API.
What we want to do is that whenever selectedType changes, we should do history.pushState with the type query parameter set to the new value of selectedType.
To achieve this, we’ll use $watch on selectedType. The $watch callback will check if the value is different from the previous one (by comparing against a cached version). If the value of selectedType is different, we’ll get the current URL (as a URL object), set the type query parameter to the new value (using new URL().searchParams.set) and call history.pushState with it (since pushState takes 3 parameters, in order, the state, the title and the new URL, we’ll pass null, document.title and the new url). We’ll also take care to update the “previous value” cache that we’re keeping.
This is implemented as follows.
<script>
  function page() {
    // populate selectedType
    return {
      // other properties
      init() {
        // other init code
        let prevType = selectedType;
        this.$watch("selectedType", (value) => {
          // only sync to URL on change...
          if (prevType !== value) {
            const url = new URL(window.location.href);
            url.searchParams.set("type", value);
            history.pushState(null, document.title, url.toString());
            prevType = value;
          }
        });
      },
      // other properties
    }
  }
</script>
We’ve now seen how sync any changes in selected type to the URL.
Implementing the new Alpine.js Weekly Collections with Alpine.js, Eleventy and sprinkles of YAML was great.
If you’re interested in Alpine.js, Subscribe to Alpine.js Weekly. A free, once–weekly email roundup of Alpine.js news and articles
Interested in Alpine.js?
Subscribe to Alpine.js Weekly. A free, once–weekly email roundup of Alpine.js news and articles
