Bring Redux to your queue logic: an Express setup with ES6 and bull queue
There always comes a point in a web application’s life where an operation is best served in the background, this is where queues come in.
There are a few queuing solutions in Node. None of them are ridiculously dominant, eg. Kue, RSMQ, Bee Queue, bull.
The issue with Kue, RSMQ and Bee Queue was its use of a done callback as the recommended API.
Bull https://github.com/OptimalBits/bull is a premium Queue package for handling jobs and messages in NodeJS. It’s backed by Redis and is pretty feature-rich. Most of all, it leverages a Promise-based processing API which means async/await.
We’ll walk through an application that sends webhooks with a given payload to a set of URLs.
You can find the full code content at https://github.com/HugoDF/express-bull-es6.
Table of Contents
This was sent out on the Code with Hugo newsletter last Monday. Subscribe to get the latest posts right in your inbox (before anyone else).
An Express application with Redis and a worker 🏃♀️
We’ll start with a Node/Redis/Express setup using docker-compose (a full walkthrough can be found at https://codewithhugo.com/setting-up-express-and-redis-with-docker-compose/), the application will be written using ES modules (by using the esm package).
To begin we’ll use the following docker-compose.yml:
version: '2'
services:
    app:
        build: .
        container_name: my-app
        environment:
            - NODE_ENV=development
            - PORT=3000
            - REDIS_URL=redis://my-cache
        command: "sh -c 'npm i && npm run dev'"
        volumes:
            - .:/var/www/app
        links:
            - redis
        ports:
            - "3000:3000"

    worker:
        build: .
        container_name: my-worker
        environment:
            - NODE_ENV=development
            - PORT=3000
            - REDIS_URL=redis://my-cache
        command: "sh -c 'npm i && npm run worker:dev'"
        volumes:
            - .:/var/www/app
        links:
            - redis

    redis:
        image: redis
        container_name: my-cache
        expose:
            - "6379"
We’ll also need a package.json as follows:
{
  "name": "express-bull-es6",
  "version": "1.0.0",
  "description": "An Express setup with Redis, bull and ES6",
  "main": "server.js",
  "scripts": {
    "start": "node -r esm server.js",
    "dev": "nodemon -r esm server.js",
    "worker": "node -r esm worker.js",
    "worker:dev": "nodemon -r esm worker.js"
  },
  "author": "Hugo Di Francesco",
  "license": "MIT",
  "dependencies": {
    "esm": "^3.0.67",
    "express": "^4.16.3",
    "nodemon": "^1.18.1"
  }
}
A server.js:
import express from 'express';

const app = express();

const PORT = process.env.PORT || 3000;
app.listen(PORT, () => {
  console.log(`Server listening on port ${PORT}`)
});
And a worker.js:
console.log('Worker doing nothing');
Running the following at the command line should get us some output (after a bit if the dependencies need to install):
$ docker-compose up
Eventually:
my-worker | [nodemon] 1.18.1
my-worker | [nodemon] to restart at any time, enter `rs`
my-worker | [nodemon] watching: *.*
my-worker | [nodemon] starting `node -r esm worker.js`
my-app    | [nodemon] 1.18.1
my-app    | [nodemon] to restart at any time, enter `rs`
my-app    | [nodemon] watching: *.*
my-app    | [nodemon] starting `node -r esm server.js`
my-worker | Worker doing nothing
my-app    | Server listening on port 3000
Setting up bull 🐮
Next, we’ll want to add bull to set up somes queues.
We’ll also set up bull-arena as a web UI to monitor these queues.
First install bull and bull-arena:
npm i --save bull bull-arena
Let’s create some queues in a queues.js file:
import Queue from 'bull';

export const NOTIFY_URL = 'NOTIFY_URL';

export const queues = {
  [NOTIFY_URL]: new Queue(
    NOTIFY_URL,
    process.env.REDIS_URL
  )
};
And update server.js to include the bull-arena UI and import the NOTIFY_URL queue.
import url from 'url';

import express from 'express';
import Arena from 'bull-arena';

import { queues, NOTIFY_URL } from './queues';

const app = express();


function getRedisConfig(redisUrl) {
  const redisConfig = url.parse(redisUrl);
  return {
    host: redisConfig.hostname || 'localhost',
    port: Number(redisConfig.port || 6379),
    database: (redisConfig.pathname || '/0').substr(1) || '0',
    password: redisConfig.auth ? redisConfig.auth.split(':')[1] : undefined
  };
}

app.use('/', Arena(
  {
    queues: [
      {
        name: NOTIFY_URL,
        hostId: 'Worker',
        redis: getRedisConfig(process.env.REDIS_URL)
      }
    ]
  },
  {
    basePath: '/arena',
    disableListen: true
  }
));

const PORT = process.env.PORT || 3000;
app.listen(PORT, () => {
  console.log(`Server listening on port ${PORT}`)
});
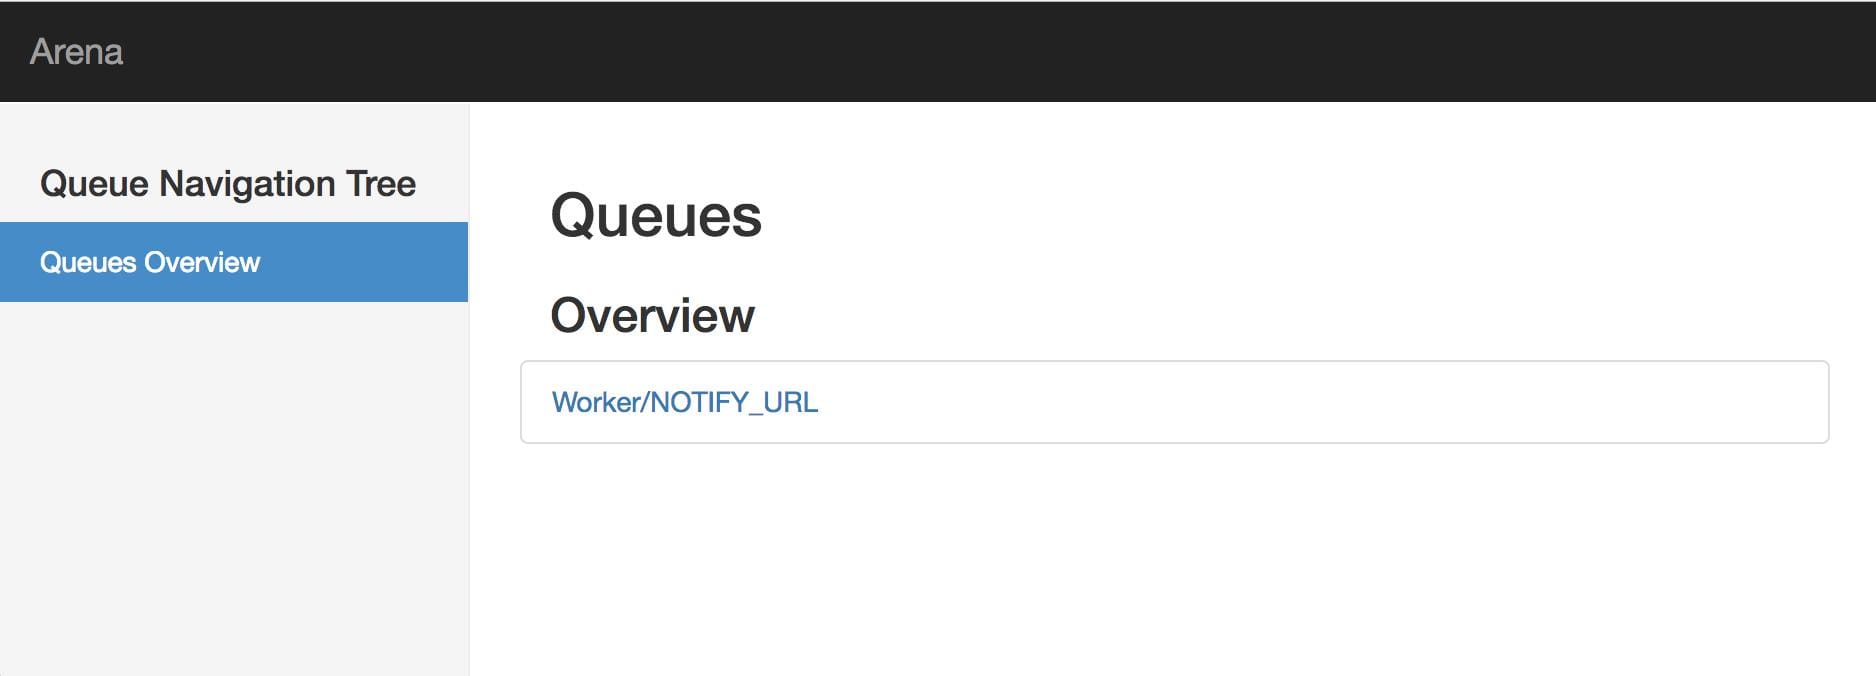
On save we’ll be able to open up http://localhost:3000/arena and see the following:
This was sent out on the Code with Hugo newsletter last Monday. Subscribe to get the latest posts right in your inbox (before anyone else).
Persisting webhook data with Redis
Accepting payloads and forwarding them on
The shape of our API will be the following:
A POST /webhooks endpoint that will accept a JSON POST body with a payload and a urls array, which will respond to the following request:
curl -X POST \
  http://localhost:3000/webhooks \
  -H 'Content-Type: application/json' \
  -d '{
	"payload": {
		"hello": "world"
	},
	"urls": [
		"http://localhost:3000/example",
		"http://localhost:3000/example"
	]
}'
A POST /webhooks/notify endpoint that will accept a JSON POST body with an id field, which will respond to a request like the following:
curl -X POST \
  http://localhost:3000/webhooks/notify \
  -H 'Content-Type: application/json' \
  -d '{
	"id": "e5d9f99f-9641-4c0a-b2ca-3b0036c2a9b3"
}'
We’ll also have a POST /example endpoint to check that our webhooks are actually being triggered.
This means we’ll need body-parser:
npm install --save body-parser
server.js will look like the following:
import url from 'url';
import express from 'express';
import bodyParser from 'body-parser';
import Arena from 'bull-arena';

import { queues, NOTIFY_URL } from './queues';

const app = express();

app.use(bodyParser.json());

app.post('/webhooks', (req, res, next) => {
  const { payload, urls } = req.body;
  res.json({
    payload,
    urls
  });
});

app.post('/webhooks/notify', async (req, res, next) => {
  const { id } = req.body;
  res.sendStatus(200);
});

app.post('/example', (req, res) => {
  console.log(`Hit example with ${JSON.stringify(req.body)}`);
  return res.sendStatus(200);
});

function getRedisConfig(redisUrl) {
  const redisConfig = url.parse(redisUrl);
  return {
    host: redisConfig.hostname || 'localhost',
    port: Number(redisConfig.port || 6379),
    database: (redisConfig.pathname || '/0').substr(1) || '0',
    password: redisConfig.auth ? redisConfig.auth.split(':')[1] : undefined
  };
}

app.use('/', Arena(
  {
    queues: [
      {
        name: NOTIFY_URL,
        hostId: 'Worker',
        redis: getRedisConfig(process.env.REDIS_URL)
      }
    ]
  },
  {
    basePath: '/arena',
    disableListen: true
  }
));

const PORT = process.env.PORT || 3000;
app.listen(PORT, () => {
  console.log(`Server listening on port ${PORT}`)
});
Persisting webhook data to Redis 💾
ioredis (a Redis client for Node) will be picked to leverage the fact that bull uses ioredis under the hood:
npm install --save ioredis
To generate unique identifiers we’ll also install the uuid package:
npm install --save uuid
A new module, db.js looks like the following:
import Redis from 'ioredis';
import { v4 as uuidV4 } from 'uuid';

const redis = new Redis(process.env.REDIS_URL);

const WEBHOOK_PREFIX = 'webhook:';
const PAYLOAD_PREFIX = `${WEBHOOK_PREFIX}payload:`;
const URLS_PREFIX = `${WEBHOOK_PREFIX}urls:`;

const makePayloadKey = id => `${PAYLOAD_PREFIX}${id}`;
const makeUrlsKey = id => `${URLS_PREFIX}${id}`;

async function setWebhook(payload, urls) {
  const id = uuidV4();
  const transaction = redis.multi()
    .hmset(makePayloadKey(id), payload)
    .lpush(makeUrlsKey(id), urls)
  await transaction.exec();
  return id;
}

async function getWebhook(id) {
  const transaction = redis.multi()
    .hgetall(makePayloadKey(id))
    .lrange(makeUrlsKey(id), 0, -1);
  const [[_, payload], [__, urls]] = await transaction.exec();
  return {
    payload,
    urls
  };
}

export const db = {
  setWebhook,
  getWebhook
};
Payloads and URLs are modelled as webhook:payload:<some-uuid> and webhook:urls:<some-uuid> respectively.
Payloads are Redis hashes (since the payload is a JSON object), and URLs are Redis lists (since we’re dealing with a list of strings).
We run into an issue whereby we want to make sure we’re setting/getting the payload and urls at the same time, hence the use of multi().
multi allows us to build transactions (operations that should be executed atomically).
At this scale (no traffic 😄), considering we only every add (never update) and that we use UUIDs, we could just as well have not used transactions,
but we’ll be good engineers and go ahead and use them anyways.
The more involved lines:
const transaction = redis.multi()
  .hgetall(makePayloadKey(id))
  .lrange(makeUrlsKey(id), 0, -1);
const [[_, payload], [__, urls]] = await transaction.exec();
Warrant an explanation:
hgetallgets all the key-value pairs in the hash,lrangegets values of the list, when used with1as start and-1as end, it gets the whole listconst output = await multi().op1().op2().exec()
Sets output to an array of return values from
op1,op2In other words
output = [ [ errorOp1, replyOp1 ], [ errorOp2, replyOp2 ] ]In order to reflect this, we ignore errors (not such good practice) and only get the replies
A better solution would be to do:
const [[errPayload, payload], [errUrls, urls]] = await transaction.exec();
if (errPayload) {
  throw errPayload;
}
if (errUrls) {
  throw errUrls
}
Saving POST data using the new db module
In server.js now looks like the following:
import url from 'url';
import express from 'express';
import bodyParser from 'body-parser';
import Arena from 'bull-arena';

import { db } from './db';
import { queues, NOTIFY_URL } from './queues';

const app = express();

app.use(bodyParser.json());

app.post('/webhooks', async (req, res, next) => {
  const { payload, urls } = req.body;
  try {
    const id = await db.setWebhook(payload, urls);
    return res.json({
      id
    });
  } catch (error) {
    next(error);
  }
});

app.post('/webhooks/notify', async (req, res, next) => {
  const { id } = req.body;
  try {
    const { payload, urls } = await db.getWebhook(id);
    return res.sendStatus(200);
  } catch (error) {
    next(error);
  }
});

app.post('/example', (req, res) => {
  console.log(`Hit example with ${JSON.stringify(req.body)}`);
  return res.sendStatus(200);
});

function getRedisConfig(redisUrl) {
  const redisConfig = url.parse(redisUrl);
  return {
    host: redisConfig.hostname || 'localhost',
    port: Number(redisConfig.port || 6379),
    database: (redisConfig.pathname || '/0').substr(1) || '0',
    password: redisConfig.auth ? redisConfig.auth.split(':')[1] : undefined
  };
}

app.use('/', Arena(
  {
    queues: [
      {
        name: NOTIFY_URL,
        hostId: 'Worker',
        redis: getRedisConfig(process.env.REDIS_URL)
      }
    ]
  },
  {
    basePath: '/arena',
    disableListen: true
  }
));

const PORT = process.env.PORT || 3000;
app.listen(PORT, () => {
  console.log(`Server listening on port ${PORT}`)
});
The main updates are:
app.post('/webhooks', async (req, res, next) => {
  const { payload, urls } = req.body;
  try {
    const id = await db.setWebhook(payload, urls);
    return res.json({
      id
    });
  } catch (error) {
    next(error);
  }
});
and:
app.post('/webhooks/notify', async (req, res, next) => {
  const { id } = req.body;
  try {
    const { payload, urls } = await db.getWebhook(id);
    return res.sendStatus(200);
  } catch (error) {
    next(error);
  }
});
You’ll notice that the POST /webhooks/notify handler still doesn’t actually notify anything or anyone 🙈.
Queuing jobs 🏭
To queue jobs, we use the queue.add method and pass it what we want to appear in job.data:
queues[NOTIFY_URL].add({
  payload,
  url,
  id
});
We want to send a request to each URL independently (that’s sort of the point of the whole queue setup) which means we want:
app.post('/webhooks/notify', async (req, res, next) => {
  const { id } = req.body;
  try {
    const { payload, urls } = await db.getWebhook(id);
    urls.forEach(url => {
      queues[NOTIFY_URL].add({
        payload,
        url,
        id
      });
    });
    return res.sendStatus(200);
  } catch (error) {
    next(error);
  }
});
Where the notable change is:
urls.forEach(url => {
  queues[NOTIFY_URL].add({
    payload,
    url,
    id
  });
});
Now that we’ve done this, if we create a new webhook:
curl -X POST \
  http://localhost:3000/webhooks \
  -H 'Content-Type: application/json' \
  -d '{
        "payload": {
                "hello": "world"
        },
        "urls": [
                "http://localhost:3000/example",
                "http://localhost:3000/example"
        ]
}'
{"id":"5fc395bf-ca2f-4654-a7ac-52f6890d0deb"}
{"id":"5fc395bf-ca2f-4654-a7ac-52f6890d0deb"} make sure to copy the id to input into the following command:
curl -X POST \
  http://localhost:3000/webhooks/notify \
  -H 'Content-Type: application/json' \
  -d '{
	"id": "5fc395bf-ca2f-4654-a7ac-52f6890d0deb"
}'
OK
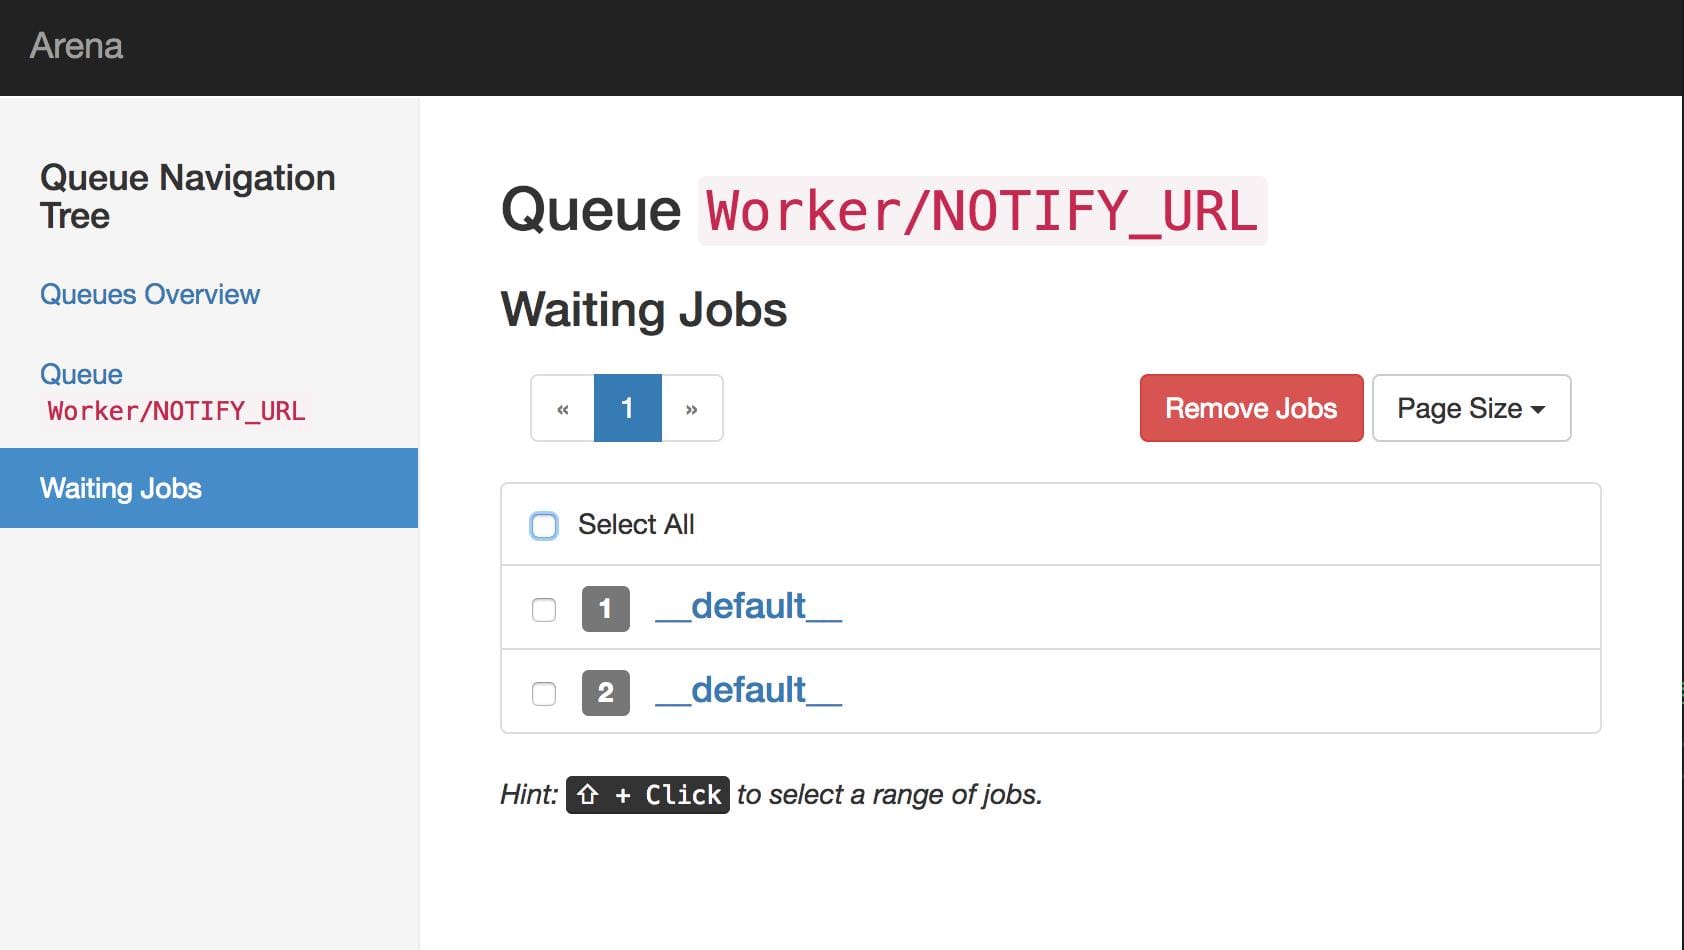
The jobs have been added to the queue, as we can check by opening bull-arena UI at http://localhost:3000/arena/Worker/NOTIFY_URL/waiting:
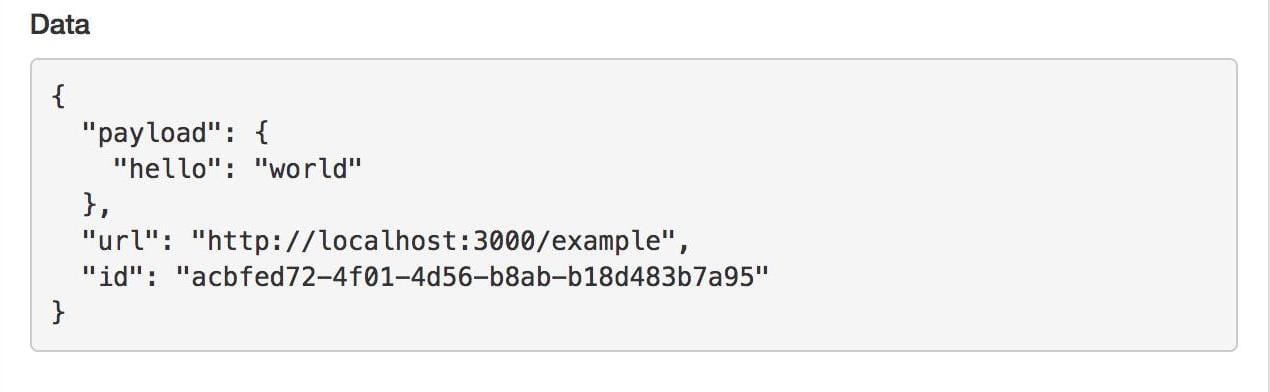
By clicking on one of the __default__ jobs, we can see the payload, urls and id are being passed in correctly:
Processing jobs ⚙️
We now want to actually process the queued jobs, ie ping some urls with some data.
To do that let’s bring in axios as a HTTP client:
npm install --save axios
Create a processors.js file:
import { NOTIFY_URL } from './queues';
import axios from 'axios';

export const processorInitialisers = {
  [NOTIFY_URL]: db => job => {
    console.log(`Posting to ${job.data.url}`);
    return axios.post(job.data.url, job.data.payload);
  }
}
For some context, the reasons we’ve gone with a db => job => Promise type signature even though we don’t need the DB currently is
to illustrate how I would pass the database or any other dependencies into the processorInitialiser.
Some other processor initialiser could look like the following:
const myOtherProcessorInitialiser = db => async job => {
  const webhook = await db.getWebhook(job.data.id);
  return Promise.all(
    webhook.urls.map(
      url => axios.post(url, webhook.payload)
    )
  );
};
To finish off, we need to actually hook up the processors to the queue, that’s done using queue.process, so in worker.js we will now have:
import { queues } from './queues';
import { processorInitialisers } from './processors';
import { db } from './db';

Object.entries(queues).forEach(([queueName, queue]) => {
  console.log(`Worker listening to '${queueName}' queue`);
  queue.process(processorInitialisers[queueName](db));
});
We can test the webhooks work by creating one that points to http://localhost:3000/example, triggering it using /webhook/notify and checking the logs, something like:
my-worker | Posting to http://localhost:3000/example
my-app    | Hit example with {"hello":"world"}
my-worker | Posting to http://localhost:3000/example
my-app    | Hit example with {"hello":"world"}
Some other stuff to do before you ship this 🚢
We should really not be exposing the bull-arena UI to the public, so if you plan on using this setup in a hosted environment either do an:
if (process.env.NODE_ENV !== 'product') {
  // Bull arena logic
}
Or add HTTP basic auth to it using a middleware of some sort.
You can read a more in-depth write up about using Docker Compose, Redis and Node/Express: https://codewithhugo.com/setting-up-express-and-redis-with-docker-compose/).
For more information about using esm, see: https://codewithhugo.com/es6-by-example-a-module/cli-to-wait-for-postgres-in-docker-compose/.
Interested in Alpine.js?
Power up your debugging with the Alpine.js Devtools Extension for Chrome and Firefox. Trusted by over 15,000 developers (rated 4.5 ⭐️).
orJoin 1000s of developers learning about Enterprise-grade Node.js & JavaScript
