Synchronize x-data and the URL in Alpine.js with the location/History APIs and $watch
Alpine.js doesn’t have a router as yet since it’s designed to deliver simple interactive experiences on top of server or statically rendered sites.
For single page applications that make heavy use of the History API or require a router, one would be better served heading over to Vue, React or Angular since they come with well-supported routers and routing solutions (eg. react-router, vue-router, reach-router, Next.js, Nuxt). If bundle size is a big concern (which it shouldn’t be for a Single Page Application), some lighter weight alternatives to the main SPA players are Preact + htm as described in No build tools route > Alternatives to JSX - Preact Docs or Riot.js with in-browser compilation.
Note that the majority of the content of this post is not Alpine.js-specific since we’ll be leveraging DOM/Web APIs heavily. What this post is, is a showcase of how to structure syncing operations between the browser URL and Alpine.js so that Alpine.js state is represented in the URL and the URL is reflected in Alpine.js state.
Table of Contents
Why use the URL to store information?
If you don’t need this question answered, feel free to skip to Read data from the URL in Alpine.js.
The URL (uniform resource locator), also know as the web address (see URL - Wikipedia) is a reference to a “web resource”.
The big benefits of driving web applications through the URL include shareability, bookmarking support, error recovery and leveraging the platform (browser) for driving common operation (eg. forward/back).
By storing the bulk of the state in the URL, users can copy the URL, share it with others and the recipients of the link (URL) will see the page in the same state as the sender.
In a similar vein, users used to bookmarking pages will be able to do so and come back to a page in the same state as the one they bookmarked.
Another benefit stemming from users’ habits is improved error recovery. In a URL-driven application, if an error occurs and causes the application to crash, the user can refresh and come back to a healthy state.
Finally leveraging the URL means leveraging “the platform” (browser), which means functionality such as forward/back and history search doesn’t have to be replicated inside the application since we can rely on browsers implementing such features.
Read data from the URL in Alpine.js
Despite not being designed to build SPAs, it can be useful to read parts of the URL
Read a query parameter from the URL in Alpine.js
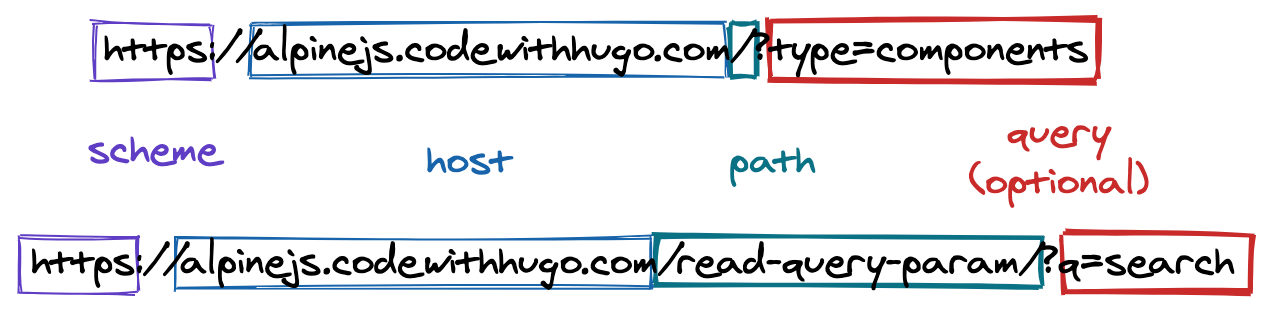
The URL’s “query” string, also referred to as the “search” string, is the part of the URL that starts from ? (if present) until a # character (which is where the “hash” starts) or the end of the URL (if there’s no hash).
The “query” is optional and would be extracted from the URLs https://alpinejs.codewithhugo.com/?type=components and https://alpinejs.codewithhugo.com/read-query-param/?q=search as follows.
We can build the Alpine.js for the /read-query-param path where the “q” query parameter is set as follows.
In x-data we need to turn the location.search string “?q=search” into a URLSearchParams object (using new URLSearchParam(location.search)). Once we have a URLSearchParams object, we can use get('q') to access the “q” query parameter, that will be what we set as the query reactive property on the x-data object initialiser.
We can then display it on the screen using x-text="query", for completeness we’ll also display the location.search property.
To enable navigation to a URL with a new “q” query parameter we can use simple anchor (a, coloquially known as “link”) tags and setting the href to ?q=my search and ?q=another search.
To reset the “q” query parameter, we can use a link with href ?q= which will set “q” to "" on click.
<div
  x-data="{
    query: new URLSearchParams(location.search).get('q')
  }"
>
  <h3>Read Query Parameter Demo</h3>
  <p class="mb-2">
    location.search: "<span x-text="location.search"></span>"
  </p>
  <p>
    Param "q" (from URL): "<span x-text="query"></span>"
  </p>
  <p>Some sample links with "q" in the URL:
    <a href="?q=my search">my search</a>,
    <a href="?q=another search">another search</a>,
    <a href="?q=">reset</a>
  </p>
</div>
The application works as in the following screen capture.
We’ve seen how to read query parameters from the URL and how to put them into Alpine’s x-data.
Next we’ll see how to read “path parameters” from the URL in Alpine.js
Read a path parameter from the URL in Alpine.js
The concept of a “path parameter” is not part of the URL definition.
A path parameter is one that is in the “path” section of the URL. It was popularised by things like REST and resource-driven URLs.
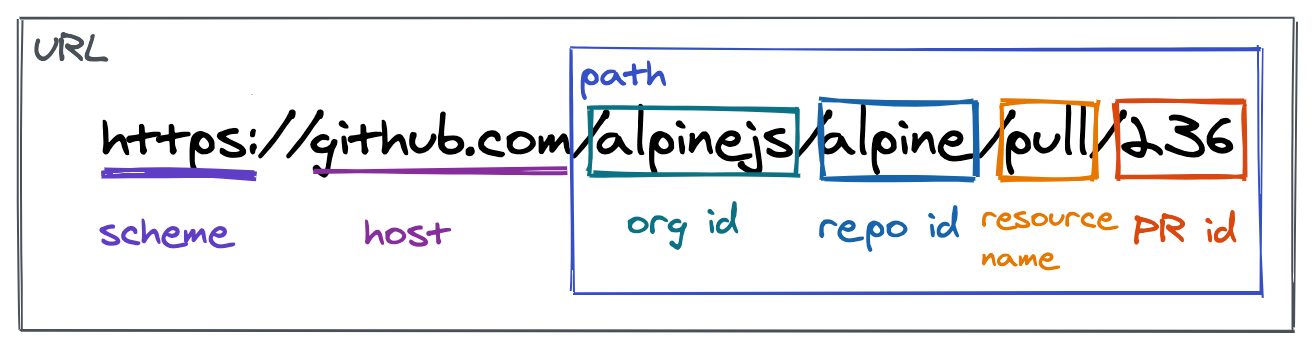
Here’s an example: https://github.com/alpinejs/alpine/pull/236. We recognise the a scheme “https”, the host “github.com” and the path “/alpinejs/alpine/pull/236”.
Within that path, we’ve got multiple “/” which usually delimits part of a resource. At the top-level/beginning we’ve got “alpinejs” which is the name of the organisation, the name of the repository “alpine” follows. We then get to the interesting bit: “pull” is the name of the resource we’re accessing on the repository and “236” is the id of the pull request (the resource).
In this case, we would most likely want to extract the “236” out. In order to do this we can use a regular expression to say “grab the numbers after ‘/pull/’”. In JavaScript that looks like the following using a positive lookbehind regex group.
const url = 'https://github.com/alpinejs/alpine/pull/236';
const [pullId] = url.match(/(?<=(\/pull\/))\d*/);

console.assert(pullId === '236');
Note: this regex code works in Node.js/Chrome but not in Firefox due to positive lookbehind support.
Another way to implement this is to just split the URL on “/” and iterate through it to find the index at which “pull” is, and get the next item after that.
const url = 'https://github.com/alpinejs/alpine/pull/236';
const urlSegments = url.split('/');
const resourceIndex = urlSegments.findIndex(segment => segment === 'pull');
const pullId = urlSegments[resourceIndex + 1];

console.assert(pullId === '236');
So that’s the JavaScript section of parsing path parameters out of the URL cleared up.
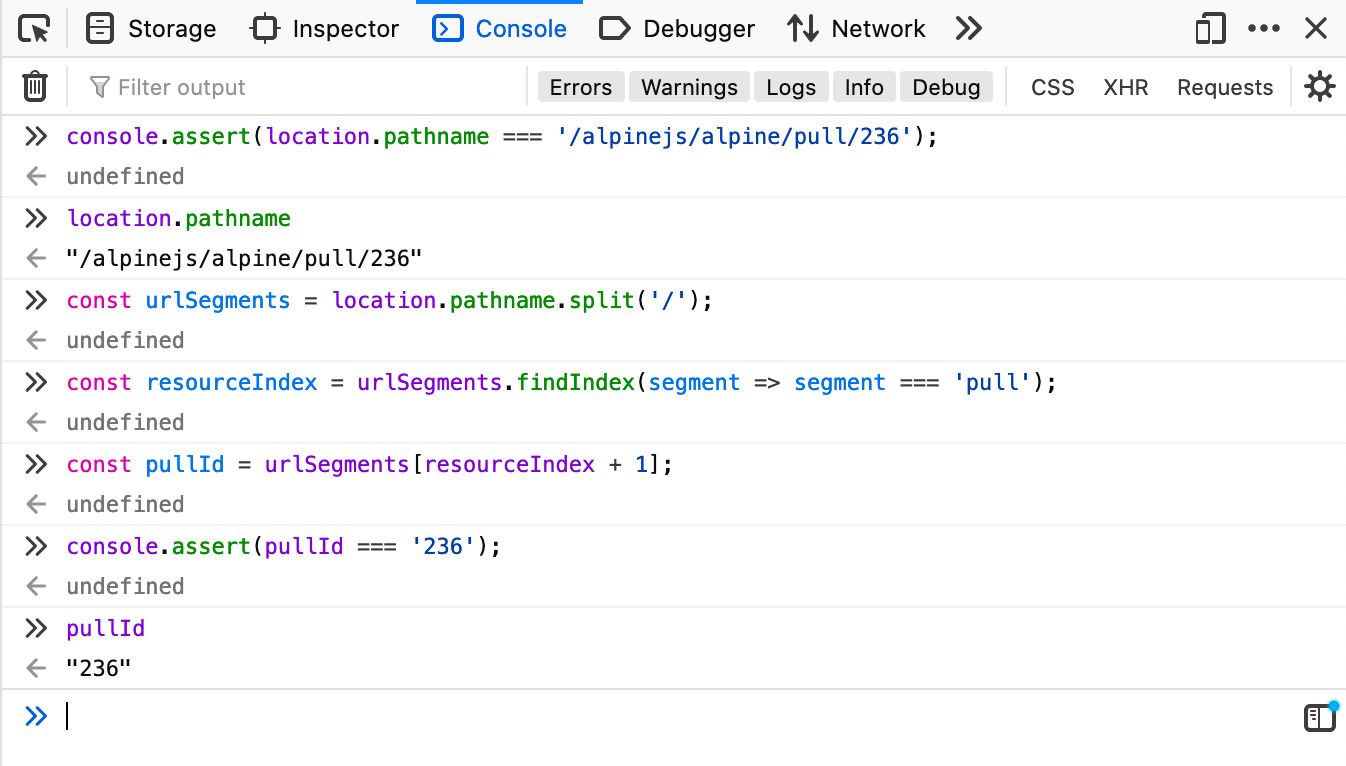
If we are on the https://github.com/alpinejs/alpine/pull/236 page we could run the same script but without setting the URL, we can read the “path” from location.pathname.
console.assert(location.pathname === '/alpinejs/alpine/pull/236');
const urlSegments = location.pathname.split('/');
const resourceIndex = urlSegments.findIndex(segment => segment === 'pull');
const pullId = urlSegments[resourceIndex + 1];

console.assert(pullId === '236');
The code can be run from the console on https://github.com/alpinejs/alpine/pull/236:
In any case, this is already starting to look more complicated and prone to more edge cases/permutations than the query parameter alternative. What that means is that in Alpine.js we should lean into query parameters more than path parameters.
What’s more path parameters are usually a sign of a single page application ie. a JavaScript application that’s running under more than 1 URL. In this example, if we were building an Alpine.js widget for the GitHub Pull Request page, I would expect the server-rendered template to pass the pullId into the Alpine.js component. Which means in the browser we end up with pullId already populated in the x-data object or with it on a global object (which is accessible on the window).
<!-- directly injected into x-data by server templates -->
<div x-data="{ pullId: '236' }"></div>
<!-- or injected into a global object -->
<div x-data="{ pullId: window.pullId }"></div>
We’ve now seen how to read query and path parameters from the location object from Alpine.js.
Next we’ll look at how to write data from Alpine.js back to the URL’s query parameters and path using the History API.
Write/sync data to the URL with Alpine.js $watch
Like we’ve seen in the introduction section, storing data in the URL is great for shareability.
That’s why it makes a lot of sense to read from the URL to initialise state, as we’ve seen in the previous section.
What’s also important is to make sure any updates to the user interface are reflected in the URL.
Since Alpine.js, at its core has a reactivity engine, we’re able to do this in a straightforward manner using $watch and history.pushState.
Syncing a query parameter to the URL with x-init and $watch
In order to sync a query parameter, we need a reactive property on the page (usually 2-way bound using x-model). In this example we’ll use library as our reactive property.
library will be initialised from the “lib” query parameter using the URLSearchParams as described in the previous section. If “lib” is missing, it gets defaulted to “alpine”.
We have a set of libraries (Vue, React, Alpine.js) that we can display on the page.
We’ll have a select that is 2-way bound to the library reactive property using x-model. The option children of this select will be generated using x-for on the libraries property.
This gives a “select” box that can be toggled to display information about Alpine.js, Vue and React.
However while sharing a URL like /?lib=react works (and will display React information), the URL doesn’t change when a new select option is selected (ie. library changes.)
<div
  x-data="{
    library: new URLSearchParams(location.search).get('lib') || 'alpine',
    libraries: [
      {
        id: 'vue',
        name: 'Vue',
        // infor
      },
      {
        id: 'react',
        name: 'React',
        // info
      },
      {
        id: 'alpine',
        name: 'Alpine.js',
        // info
      }
    ]
  }"
>
  <h3>Write Query Parameter Demo</h3>
  <p>location.search: "<span x-text="location.search"></span>"</p>
  <p>Param "library" (initialised from "lib" URL query param): "<span
    x-text="library"
  ></span>"</p>
  <select
    name="lib"
    x-model="library"
  >
    <template x-for="lib in libraries" :key="lib.id">
      <option
        :value="lib.id"
        x-text="lib.name"
        :selected="lib.id === library"
      ></option>
    </template>
  </select>
  <template x-if="library">
    <ul>
      Library information:
      <li>
        <strong>Name</strong>:
        <span x-text="libraries.find(l => l.id === library).name"></span>
      </li>
      <li>
        <strong>Description</strong>:
        <span
          x-text="libraries.find(l => l.id === library).description"
        ></span>
      </li>
      <li>
        <strong>Stars</strong>:
        <span x-text="libraries.find(l => l.id === library).stars"></span>
      </li>
    </ul>
  </template>
</div>
In order to sync library back to the URL we can use the x-init function to set up a $watch which will update the “lib” query parameter when library changes.
We use the URL constructor to parse the location.href. This constructed URL object has a searchParams property which is a URLSearchParams object, and hence has a .set() function which is analogous to the get() function we saw in previous sections.
Thus we can use url.searchParams.set('lib', value) to set the lib query parameter to value in the newly-parse URL.
Finally we can write this updated URL back to the browser location using history.pushState(). pushState takes 3 parameters: state, title, and URL. In our case, state will be null, title will be document.title (no change), and URL will be our new URL in string format (url.toString()).
<div
  x-data="// no change to data"
  x-init="$watch('library', (value) => {
    const url = new URL(window.location.href);
    url.searchParams.set('lib', value);
    history.pushState(null, document.title, url.toString());
  })"
>
  <!-- rest of template -->
</div>
This is how this select syncs to the “lib” query parameter in action, you can see it for yourself at alpinejs.codewithhugo.com/write-query-param/.
We’ve now seen how to sync query parameters from Alpine.js reactive state/x-data back to the URL using x-init, $watch, the URL constructor and history.pushState.
In the next section we’ll sketch out how to achieve a similar result in a situation where we have path parameters to update.
Sync x-data to a path parameter with pushState
Sync state to a path parameter using history.pushState(), in a similar fashion to reading a URL with path parameters, is a case of JavaScript string wrangling which tends to involve some amount regex.
The current URL or path can be read from location.href or location.pathname respectively.
We can adopt an approach similar to the query parameter syncing can be used to sync path parameters
Much like we did with the query parameters, we need to compute the new URL to pass it to pushState/replaceState, probably using x-init and $watch.
We’ve now sketched out an approach to syncing state to a path parameter.
In the next section we’ll look at the differences and use-cases for the History API’s pushState and replaceState.
pushState vs replaceState
Leveraging URLs is great to make pages shareable, robust and leverage the platform. With the History API and Alpine.js we are able to read and write to the URL.
One of the remaining questions is when to use pushState and when to use replaceState.
The differences between replaceState and pushState is that pushState creates a new history entry (like opening a link) whereas replaceState does not, instead it replaces the latest history entry with the passed parameters.
As to answering the question of when to use each: usually we want to prefer replaceState if the updates are programmatic. For example we want to strip an unused query parameter.
pushState more closely resembles the behaviour of regular navigation or a form submission so should be preffered in those situations. For example the “select” updating the URL would work if we were submitting a form that contained the select.
Parting thoughts
This post should have given you an idea of how to integrate the URL in your Alpine.js and JavaScript applications.
That’s it for this post, you can check out the Alpine.js tag on Code with Hugo for more in-depth Alpine.js guides.
If you’re interested in Alpine.js, Subscribe to Alpine.js Weekly. A free, once–weekly email roundup of Alpine.js news and articles.
Interested in Alpine.js?
Power up your debugging with the Alpine.js Devtools Extension for Chrome and Firefox. Trusted by over 15,000 developers (rated 4.5 ⭐️).
